Here we will first take excerpts with minor modifications from the end of Chapter 12. Resilient Distributed Datasets (RDDs) of Spark: The Definitive Guide:
- https://learning.oreilly.com/library/view/spark-the-definitive/9781491912201/ch12.html
Next, we will do Bayesian AB Testing using PipedRDDs.
First, we create the toy RDDs as in The Definitive Guide:
From a Local Collection
To create an RDD from a collection, you will need to use the parallelize method on a SparkContext (within a SparkSession). This turns a single node collection into a parallel collection. When creating this parallel collection, you can also explicitly state the number of partitions into which you would like to distribute this array. In this case, we are creating two partitions:
// in Scala
val myCollection = "Spark The Definitive Guide : Big Data Processing Made Simple"  .split(" ")
val words = spark.sparkContext.parallelize(myCollection, 2)
# in Python
myCollection = "Spark The Definitive Guide : Big Data Processing Made Simple"\
  .split(" ")
words = spark.sparkContext.parallelize(myCollection, 2)
words
glom from The Definitive Guide
glomis an interesting function that takes every partition in your dataset and converts them to arrays. This can be useful if you’re going to collect the data to the driver and want to have an array for each partition. However, this can cause serious stability issues because if you have large partitions or a large number of partitions, it’s simple to crash the driver.
Let's use glom to see how our words are distributed among the two partitions we used explicitly.
words.glom.collect
words.glom().collect()
Checkpointing from The Definitive Guide
One feature not available in the DataFrame API is the concept of checkpointing. Checkpointing is the act of saving an RDD to disk so that future references to this RDD point to those intermediate partitions on disk rather than recomputing the RDD from its original source. This is similar to caching except that it’s not stored in memory, only disk. This can be helpful when performing iterative computation, similar to the use cases for caching:
Let's create a directory in dbfs:/// for checkpointing of RDDs in the sequel. The following %fs mkdirs /path_to_dir is a shortcut to create a directory in dbfs:///
mkdirs /datasets/ScaDaMaLe/checkpointing/
spark.sparkContext.setCheckpointDir("dbfs:///datasets/ScaDaMaLe/checkpointing")
words.checkpoint()
Now, when we reference this RDD, it will derive from the checkpoint instead of the source data. This can be a helpful optimization.
YouTry
Just some more words in haha_words with \n, the End-Of-Line (EOL) characters, in-place.
val haha_words = sc.parallelize(Seq("ha\nha", "he\nhe\nhe", "ho\nho\nho\nho"),3)
Let's use glom to see how our haha_words are distributed among the partitions
haha_words.glom.collect
Pipe RDDs to System Commands
The pipe method is probably one of Spark’s more interesting methods. With pipe, you can return an RDD created by piping elements to a forked external process. The resulting RDD is computed by executing the given process once per partition. All elements of each input partition are written to a process’s stdin as lines of input separated by a newline. The resulting partition consists of the process’s stdout output, with each line of stdout resulting in one element of the output partition. A process is invoked even for empty partitions.
The print behavior can be customized by providing two functions.
We can use a simple example and pipe each partition to the command wc. Each row will be passed in as a new line, so if we perform a line count, we will get the number of lines, one per partition:
The following produces a PipedRDD:
val wc_l_PipedRDD = words.pipe("wc -l")
wc_l_PipedRDD = words.pipe("wc -l")
wc_l_PipedRDD
Now, we take an action via collect to bring the results to the Driver.
NOTE: Be careful what you collect! You can always write the output to parquet of binary files in dbfs:/// if the returned output is large.
wc_l_PipedRDD.collect
wc_l_PipedRDD.collect()
In this case, we got the number of lines returned by wc -l per partition.
YouTry
Try to make sense of the next few cells where we do NOT specifiy the number of partitions explicitly and let Spark decide on the number of partitions automatically.
val haha_words = sc.parallelize(Seq("ha\nha", "he\nhe\nhe", "ho\nho\nho\nho"),3)
haha_words.glom.collect
val wc_l_PipedRDD_haha_words = haha_words.pipe("wc -l")
wc_l_PipedRDD_haha_words.collect()
Do you understand why the above collect statement returns what it does?
val haha_words_again = sc.parallelize(Seq("ha\nha", "he\nhe\nhe", "ho\nho\nho\nho"))
haha_words_again.glom.collect
val wc_l_PipedRDD_haha_words_again = haha_words_again.pipe("wc -l")
wc_l_PipedRDD_haha_words_again.collect()
Did you understand why some of the results are 0 in the last collect statement?
mapPartitions
The previous command revealed that Spark operates on a per-partition basis when it comes to actually executing code. You also might have noticed earlier that the return signature of a map function on an RDD is actually
MapPartitionsRDD.
Or ParallelCollectionRDD in our case.
This is because map is just a row-wise alias for
mapPartitions, which makes it possible for you to map an individual partition (represented as an iterator). That’s because physically on the cluster we operate on each partition individually (and not a specific row). A simple example creates the value “1” for every partition in our data, and the sum of the following expression will count the number of partitions we have:
// in Scala
words.mapPartitions(part => Iterator[Int](1)).sum() // 2.0
# in Python
words.mapPartitions(lambda part: [1]).sum() # 2
Naturally, this means that we operate on a per-partition basis and therefore it allows us to perform an operation on that entire partition. This is valuable for performing something on an entire subdataset of your RDD. You can gather all values of a partition class or group into one partition and then operate on that entire group using arbitrary functions and controls. An example use case of this would be that you could pipe this through some custom machine learning algorithm and train an individual model for that company’s portion of the dataset. A Facebook engineer has an interesting demonstration of their particular implementation of the pipe operator with a similar use case demonstrated at Spark Summit East 2017.
Other functions similar to
mapPartitionsincludemapPartitionsWithIndex. With this you specify a function that accepts an index (within the partition) and an iterator that goes through all items within the partition. The partition index is the partition number in your RDD, which identifies where each record in our dataset sits (and potentially allows you to debug). You might use this to test whether your map functions are behaving correctly:
// in Scala
def indexedFunc(partitionIndex:Int, withinPartIterator: Iterator[String]) = {  withinPartIterator.toList.map(
  value => s"Partition: $partitionIndex => $value").iterator
                                                                            }
words.mapPartitionsWithIndex(indexedFunc).collect()
# in Python
def indexedFunc(partitionIndex, withinPartIterator):
  return ["partition: {} => {}".format(partitionIndex,    x) for x in withinPartIterator]
words.mapPartitionsWithIndex(indexedFunc).collect()
foreachPartition
Although
mapPartitionsneeds a return value to work properly, this next function does not.foreachPartitionsimply iterates over all the partitions of the data. The difference is that the function has no return value. This makes it great for doing something with each partition like writing it out to a database. In fact, this is how many data source connectors are written. You can create
your
own text file source if you want by specifying outputs to the temp directory with a random ID:
words.foreachPartition { iter =>
  import java.io._
  import scala.util.Random
  val randomFileName = new Random().nextInt()
  val pw = new PrintWriter(new File(s"/tmp/random-file-${randomFileName}.txt"))
  while (iter.hasNext) {
    pw.write(iter.next())
  }
  pw.close()
}
You’ll find these two files if you scan your /tmp directory.
You need to scan for the file across all the nodes. As the file may not be in the Driver node's /tmp/ directory but in those of the executors that hosted the partition.
pwd
ls /tmp/random-file-*.txt
Numerically Rigorous Bayesian AB Testing
This is an example of Bayesian AB Testing with computer-aided proofs for the posterior samples.
The main learning goal for you is to use pipedRDDs to distribute, in an embarassingly paralle way, across all the worker nodes in the Spark cluster an executible IsIt1or2Coins.
What does IsIt1or2Coins do?
At a very high-level, to understand what IsIt1or2Coins does, imagine the following simple experiment.
We are given
- the number of heads that result from a first sequence of independent and identical tosses of a coin and then
- we are given the number of heads that result from a second sequence of independent and identical tosses of a coin
Our decision problem is to do help shed light on whether both sequence of tosses came from the same coin or not (whatever the bias may be).
IsIt1or2Coins tries to help us decide if the two sequence of coin-tosses are based on one coin with an unknown bias or two coins with different biases.
If you are curious about details feel free to see:
- Exact Bayesian A/B testing using distributed fault-tolerant Moore rejection sampler, Benny Avelin and Raazesh Sainudiin, Extended Abstract, 2 pages, 2018 (PDF 104KB).
- which builds on: An auto-validating, trans-dimensional, universal rejection sampler for locally Lipschitz arithmetical expressions, Raazesh Sainudiin and Thomas York, Reliable Computing, vol.18, pp.15-54, 2013 (preprint: PDF 2612KB)
See first about PipedRDDs excerpt from Spark The Definitive Guide earlier.
Getting the executible IsIt1or2Coins into our Spark Cluster
This has already been done in the project-shard. You need not do it again for this executible!
You need to upload the C++ executible IsIt1or2Coins from: - https://github.com/lamastex/mrs2
Here, suppose you have an executible for linux x86 64 bit processor with all dependencies pre-compiled into one executibe.
Say this executible is IsIt10r2Coins.
This executible comes from the following dockerised build:
- https://github.com/lamastex/mrs2/tree/master/docker
- by statically compiling inside the docerised environment for mrs2:
- https://github.com/lamastex/mrs2/tree/master/mrs-2.0/examples/MooreRejSam/IsIt1or2Coins
You can replace the executible with any other executible with appropriate I/O to it.
Then you upload the executible to databricks' FileStore.
Just note the path to the file and DO NOT click Create Table or other buttons!
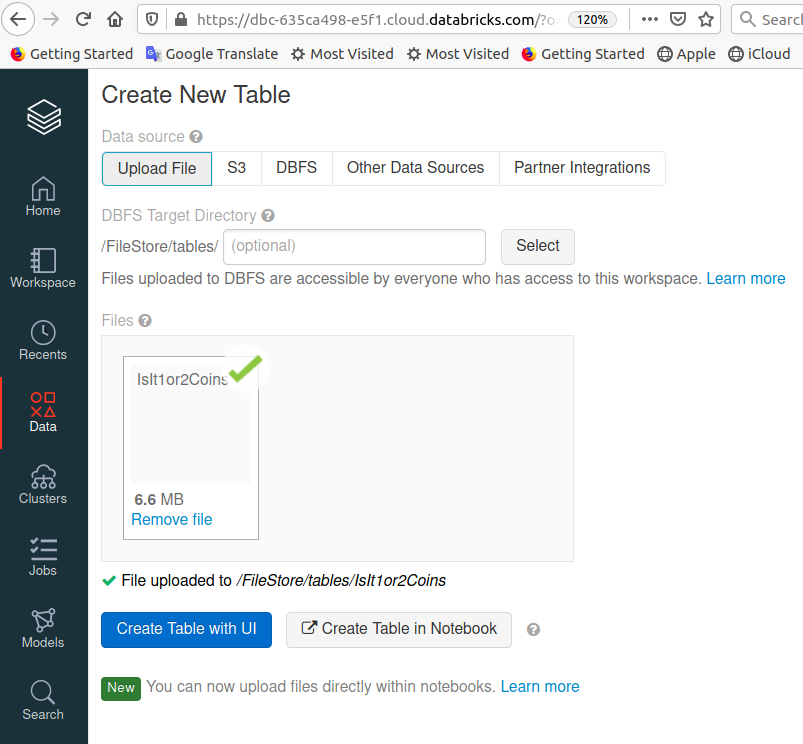
ls "/FileStore/tables/IsIt1or2Coins"
Now copy the file from dbfs://FileStore that you just uploaded into the local file system of the Driver.
dbutils.fs.cp("dbfs:/FileStore/tables/IsIt1or2Coins", "file:/tmp/IsIt1or2Coins")
ls -al /tmp/IsIt1or2Coins
Note it is a big static executible with all dependencies inbuilt (it uses GNU Scientific Library and a specialized C++ Library called C-XSC or C Extended for Scientific Computing to do hard-ware optimized rigorous numerical proofs using Interval-Extended Hessian Differentiation Arithmetics over Rounding-Controlled Hardware-Specified Machine Intervals).
Just note it is over 6.5MB. Also we need to change the permissions so it is indeed executible.
chmod +x /tmp/IsIt1or2Coins
Usage instructions for IsIt1or2Coins
./IsIt1or2Coins numboxes numiter seed numtosses1 heads1 numtosses2 heads2 logScale - numboxes = Number of boxes for Moore Rejection Sampling (Rigorous von Neumann Rejection Sampler) - numiter = Number of samples drawn from posterior distribution to estimate the model probabilities - seed = a random number seed - numtosses1 = number of tosses for the first coin - heads1 = number of heads shown up on the first coin - numtosses2 = number of tosses for the second coin - heads2 = number of heads shown up on the second coin - logscale = True/False as Int
Don't worry about the details of what the executible IsIt1or2Coins is doing for now. Just realise that this executible takes some input on command-line and gives some output.
Let's make sure the executible takes input and returns output string on the Driver node.
/tmp/IsIt1or2Coins 1000 100 234565432 1000 500 1200 600 1
# You can also do it like this

/dbfs/FileStore/tables/IsIt1or2Coins 1000 100 234565432 1000 500 1200 600 1
To copy the executible from dbfs to the local drive of each executor you can use the following helper function.
import scala.sys.process._
import scala.concurrent.duration._
// from Ivan Sadikov

def copyFile(): Unit = {
  "mkdir -p /tmp/executor/bin".!!
  "cp /dbfs/FileStore/tables/IsIt1or2Coins /tmp/executor/bin/".!!
}

sc.runOnEachExecutor(copyFile, new FiniteDuration(1, HOURS))
Now, let us use piped RDDs via bash to execute the given command in each partition as follows:
val input = Seq("/tmp/executor/bin/IsIt1or2Coins 1000 100 234565432 1000 500 1200 600 1", "/tmp/executor/bin/IsIt1or2Coins 1000 100 234565432 1000 500 1200 600 1")

val output = sc
  .parallelize(input)
  .repartition(2)
  .pipe("bash")
  .collect()
In fact, you can just use DBFS FUSE to run the commands without any file copy in databricks-provisioned Spark clusters we are on here:
val isIt1or2StaticExecutible = "/dbfs/FileStore/tables/IsIt1or2Coins"
val same_input = Seq(s"$isIt1or2StaticExecutible 1000 100 234565432 1000 500 1200 600 1",
                     s"$isIt1or2StaticExecutible 1000 100 234565432 1000 500 1200 600 1")

val same_output = sc
  .parallelize(same_input)
  .repartition(2)
  .pipe("bash")
  .collect()
Thus by mixing several different executibles that are statically compiled for linux 64 bit machine, we can mix and match multiple executibles with appropriate inputs.
The resulting outputs can themselves be re-processed in Spark to feed into toher pipedRDDs or normal RDDs or DataFrames and DataSets.
Finally, we can have more than one command per partition and then use mapPartitions to send all the executible commands within the input partition that is to be run by the executor in which that partition resides as follows:
val isIt1or2StaticExecutible = "/dbfs/FileStore/tables/IsIt1or2Coins"

// let us make 2 commands in each of the 2 input partitions
val same_input_mp = Seq(s"$isIt1or2StaticExecutible 1000 100 234565432 1000 500 1200 600 1",
                        s"$isIt1or2StaticExecutible 1000 100 123456789 1000 500 1200 600 1",
                        s"$isIt1or2StaticExecutible 1000 100 123456789 1000 500 1200 600 1",
                        s"$isIt1or2StaticExecutible 1000 100 234565432 1000 500 1200 600 1")

val same_output_mp = sc
  .parallelize(same_input)
  .repartition(2)
  .pipe("bash")
  .mapPartitions(x => Seq(x.mkString("\n")).iterator)
  .collect()
allCatch is a useful tool to use as a filtering function when testing if a command will work without error.
import scala.util.control.Exception.allCatch
(allCatch opt " 12 ".trim.toLong).isDefined